Mastering Picanha—The Crown Jewel of Brazilian Steak
“Picanha isn’t just steak—it’s a performance . That thick fat cap? It’s not just for show; it’s the star of the show. As it melts, it bastes the meat, creating a flavor bomb that even your carnivore friends will rave about. But here’s the catch: If you trim too much fat, skip the right seasoning, or panic over grill temps, you’ll end up with chewy disappointment. Trust me—I’ve been there. Let’s fix the common mistakes and turn you into the Picanha whisperer of your neighborhood
First things first: Don’t grab just any cut. Hunt for the good stuff. Bright red meat with veins of fat (marbling) is your holy grail. And that fat cap? It should be thick, firm, and creamy-white—not yellow or flabby. Once you’ve got the star of the show, here’s where most people mess up: Trimming. Leave some fat! Trim it down to about ¼-inch thick—it’s the difference between juicy and dry. Now, let’s talk seasoning: Keep it simple (coarse salt) or go wild (smoky paprika, garlic powder, a splash of lime zest). Finally, your cooking method: Charcoal for drama, oven for control, or cast iron for that unbeatable sear. Your call—but let’s do it right
By the time you finish this guide, you’ll be the one teaching your friends how to nail Picanha. We’ll cover:*
How to spot the perfect cut at the butcher counter (hint: avoid pale pink fat—it’s a red flag).
Why sous-vide is a secret weapon (even if you’re grilling).
The one seasoning mistake that ruins Picanha (and how to fix it).
Slicing like a pro: Why cutting against the grain is non-negotiable.
No more guesswork. No more wasted money. Just juicy, flame-kissed perfection. Let’s get started.
Alright, let’s fire up the grill. First step: Finding the best Picanha money can buy. Let’s go
Let’s get real: Picanha isn’t just steak—it’s a grilling superpower . But here’s the kicker: If you grab the wrong cut, you’re basically wasting money. I learned this the hard way after burning through $50 on a sad, chewy hunk of meat. Trust me, the secret to that juicy, flame-kissed magic lives in two places: the fat cap and the marbling. Let’s geek out on how to pick the perfect cut.
The Fat Cap: Your Steak’s Secret Weapon*
That thick layer of fat? It’s not the enemy—it’s your flavor engine . Think of it like a built-in baster. As it melts, it drips down the sides of the meat, keeping it juicy and creating that crispy, golden crust everyone loses their minds over. But not all fat caps are created equal. You want one that’s:
Creamy-white , like fresh lard (yes, that’s a good thing).
Firm to the touch , not floppy or yellowed (that’s old-school, and trust me, it tastes like disappointment).
And here’s my #1 pro move: Don’t trim it all off! Leave about ¼-inch. I once trimmed mine to oblivion… let’s just say the result tasted like cardboard. Lesson learned.
Marbling: The Gold Veins of Greatness*
Okay, picture this: You’re staring at a raw Picanha steak. What should you see? A network of thin, white streaks running through the meat—that’s marbling, and it’s pure magic. Those tiny veins of fat melt as it cooks, keeping the meat tender and packing in flavor. Without it, you’re just chewing on shoe leather. Brazilian steakhouse vibes? Gone.
Lean cuts are a trap. They might look healthier, but they’ll dry out faster than you can say ‘churrasco.’ Hunt for cuts with even marbling—like veins of gold in a mine. That’s your ticket to buttery, fall-apart tenderness “Where to Find the Good Stuff
Supermarkets? Fine. But if you want great , hit up a local butcher. These folks are meat wizards—they’ll hook you up with cuts that have:
A fat cap thicker than my morning coffee mug.
Marbling so fine it looks like a marble countertop.
Pro tip: Build a relationship with your butcher. Mine now texts me when fresh Picanha arrives—lifesaver! In Latin markets, ask for ‘capa de filete’ (locals love that). And avoid pre-packaged steaks like the plague. Those often have wonky fat layers or look like someone gave them a buzzcut. Not ideal.
Grass-Fed vs. Grain-Fed: Choose Your Adventure*
This is the flavor face-off. Here’s the lowdown:
Grass-fed : Leaner, with an earthy, almost gamey kick (think hiking boots and campfire vibes). Great if you’re watching fat intake, but easy to overcook. I’ve ruined a few grass-fed cuts trying to replicate that churrasco magic—lesson: patience is key.
Grain-fed : Buttery, rich, and marbled like a Rembrandt painting. This is the OG choice for Brazilian BBQ. It’s like the difference between a basic burger and a Wagyu masterpiece.
My pick? Grain-fed for pure indulgence. Grass-fed if you’re after that rustic, ‘I’m-one-with-nature’ vibe. Both work—just tweak your grilling game accordinglyFinal Touch: Add a Hook for the Next Section
“Now that we’ve geeked out over fat caps and marbling, let’s talk prep. Because even the best cut can flop if you skip the basics. Next up: How to prep your Picanha like a pitmaster (hint: salt is your best friend)..
Preparing Picanha for Cooking
Okay, so you’ve scored an epic Picanha cut—congrats! But don’t fire up the grill just yet. This is where most people mess up. I used to over-trim the fat cap, under-season, and panic over grill temps… and wound up with steak that tasted like cardboard. Let’s fix that. Here’s how to prep like a churrasco pro (no butcher apron required)
The Fat Cap: Don’t Be a Hero
Look, I get it—trimming all that fat feels virtuous. But trust me, you’re not doing your steak any favors. That fat cap is your best friend: As it melts, it bastes the meat and creates that crackly, golden crust everyone loses their minds over. Here’s the deal:
Leave at least ¼-inch. Any thinner, and you’re just asking for dryness.
Trim uneven patches. If one side is thicker than the other, even it out—it’ll cook more evenly.
Score it like a pro. Grab a sharp knife and make shallow diagonal cuts in a crisscross pattern (like a hashtag #). This does two things: prevents curling and helps the fat render faster. I learned this trick after my first Picanha looked like a taco shell—lesson learned
Seasoning: Keep It Simple, Stupid
Picanha doesn’t need a parade of spices—it’s already a flavor bomb. Think of seasoning like picking an outfit: You want to highlight the steak, not hide it. Here’s what works:
Coarse salt : This is the MVP. I’m talking sea salt or kosher salt—sprinkle it like confetti. It pulls out flavor without overpowering.
Spice rub (if you’re feeling spicy) : Mix salt with garlic powder, smoked paprika, or cracked black pepper. Don’t go overboard—this isn’t chili powder night.
Marinades? Maybe for grass-fed : If you’re using leaner grass-fed beef, a splash of olive oil, lime juice, and garlic helps tenderize and add depth. Just don’t drown it.
Pro tip: Season at least 30 minutes before cooking. This isn’t a last-minute sprinkle situation. Let the meat sit at room temp while you prep the grill—this is your secret to even cooking
- Your Grilling Toolkit: Don’t Wing It
You wouldn’t build a treehouse with a butter knife—same goes for Picanha. Here’s what you need:A meat thermometer : Your grilling best friend. Medium-rare? 130°F. Medium? 140°F. No more guessing games (trust me, your gut is lying).
A sharp knife : Dull blades = shredded meat. Keep your knife honed. I use a boning knife for trimming fat and a chef’s knife for slicing.
Cast-iron skillet or grill : Heat retention is everything. If you don’t own cast iron, grab a heavy stainless steel pan—it’s the budget-friendly cousin. And if you’re grilling, preheat those grates until they’re white-hot. You want that sear to sing
Final Touch: Hook for Next Section
“Alright, your Picanha’s prepped—salted, scored, and ready to rock. Now it’s time to turn up the heat. Next up: Grilling like a boss (and avoiding the ‘charred on the outside, raw on the inside’ nightmare). Let’s go
Pro Cooking Methods for Picanha
Alright, your Picanha’s prepped—salted, scored, and ready to rock. Now it’s time to turn up the heat. But here’s the deal: Not all cooking methods are created equal. I used to sear mine on a cold pan and wonder why it tasted like sadness. Let’s fix that. Whether you’ve got a backyard grill, a cast-iron skillet, or a smoker, here’s how to nail Picanha like a pitmaster (no apron required)
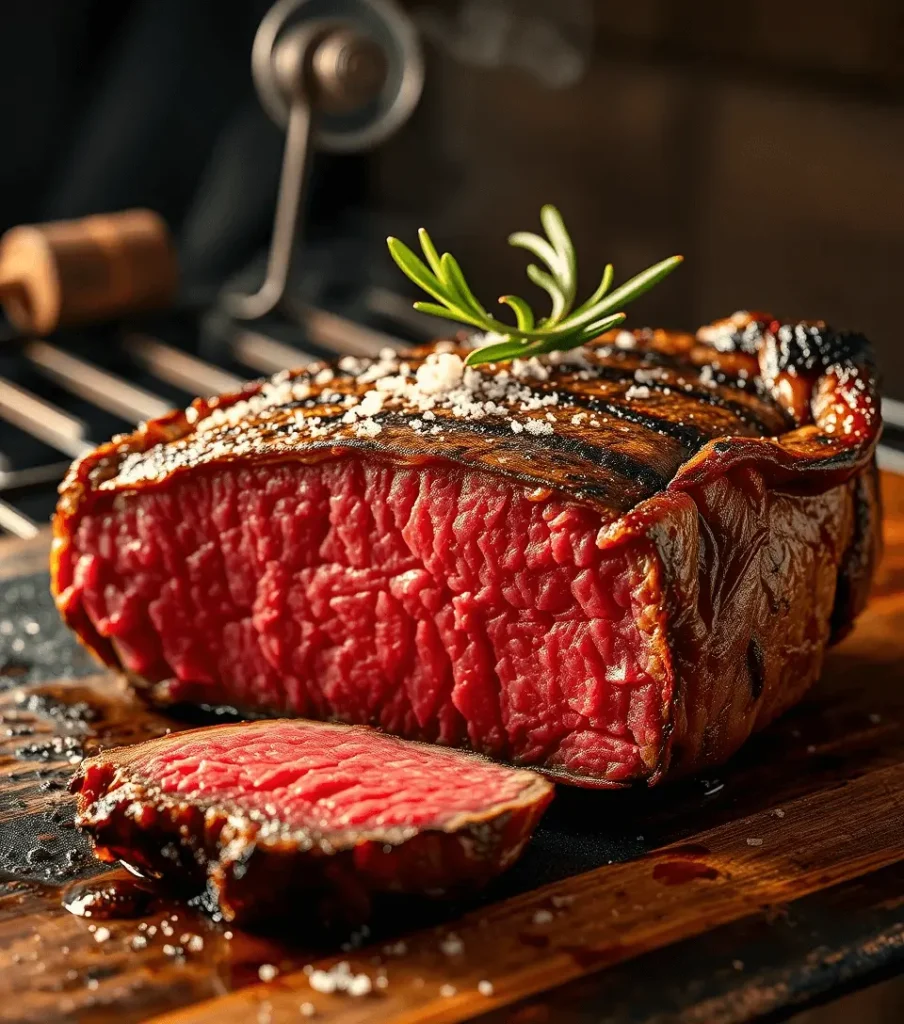
Grilling: Fire, Smoke, and That Golden Crust
Charcoal grilling is where Picanha becomes legend . The smoky kiss of open flames, the sizzle of fat hitting hot coals—it’s primal, it’s messy, it’s magic. Here’s how to nail it:
Build a two-zone fire : Pile half the coals on one side (for searing), leave the rest bare (for finishing). This isn’t a bonfire—it’s a strategy.
Wait for the right heat : 375°F–400°F is your sweet spot. Don’t rush—those coals need to glow white-hot, not red. Patience, grasshopper.
Sear the fat cap first : 3 minutes over direct heat. Listen for that crackle—music to a carnivore’s ears. Then move to indirect heat, flip every few minutes, and pull at 130°F. Let it rest under foil while you high-five yourself.
Pro tip: If your grill doesn’t have a thermometer, hold your hand 3 inches above the grate. If you can only last 2 seconds, you’re good to go
Reverse Sear: Slow and Steady Wins the Race
Got a monster Picanha that looks like a dinosaur rib? Reverse-sear is your move. It’s like giving your steak a spa day before the sear party. Here’s the plan:
Low-and-slow warm-up : Set oven to 250°F. Rest steak on a wire rack (so air circulates). Let it roast like it’s on vacation until it hits 115°F. This takes 45–60 minutes—perfect time to open a beer and pretend you’re not impatient.
Sear for glory : Heat cast iron until it’s screaming hot. 1–2 minutes per side, and boom—you’ve got a crust so loud it’ll wake the neighbors.
Why this works: Even cooking from edge to edge, zero gray rings of doom. Plus, that crust? Crackles like autumn leaves. Magic.
Pan-Searing: When You’re Stuck Inside
Don’t cry over no backyard—your cast iron’s got you. Here’s how to fake that churrasco vibe indoors:
Heat it up : Skillet on high until it’s smoking. You want that sizzle to sing.
Fat cap first : 3–4 minutes to crisp, then flip. Baste with butter, garlic, and thyme—yes, even if your kitchen smells like a spa.
Oven trick : If your steak’s thicker than my wallet, pop it in a 400°F oven for 5–10 minutes. No more raw centers!
Warning: Your apartment will smell amazing. Roommates may demand seconds
Smoking: The Flavor Time Machine
Want your Picanha to taste like it’s been kissed by a campfire? Smoke it. This isn’t fast, but it’s worth it. Here’s how:
Set your smoker to 225°F–250°F : Patience pays off. Keep it steady—no peeking!
Wood choice matters : Hickory for boldness (think lumberjack dreams), mesquite for intensity, or cherry for a sweet, fruity note.
Fat cap up : Let it absorb that smoky love for 1–1.5 hours until 125°F. Optional: Quick sear after smoking for a crust.
Pro tip: Pair with smoky vinagrete (chili, cilantro, lime) to make your taste buds throw a party
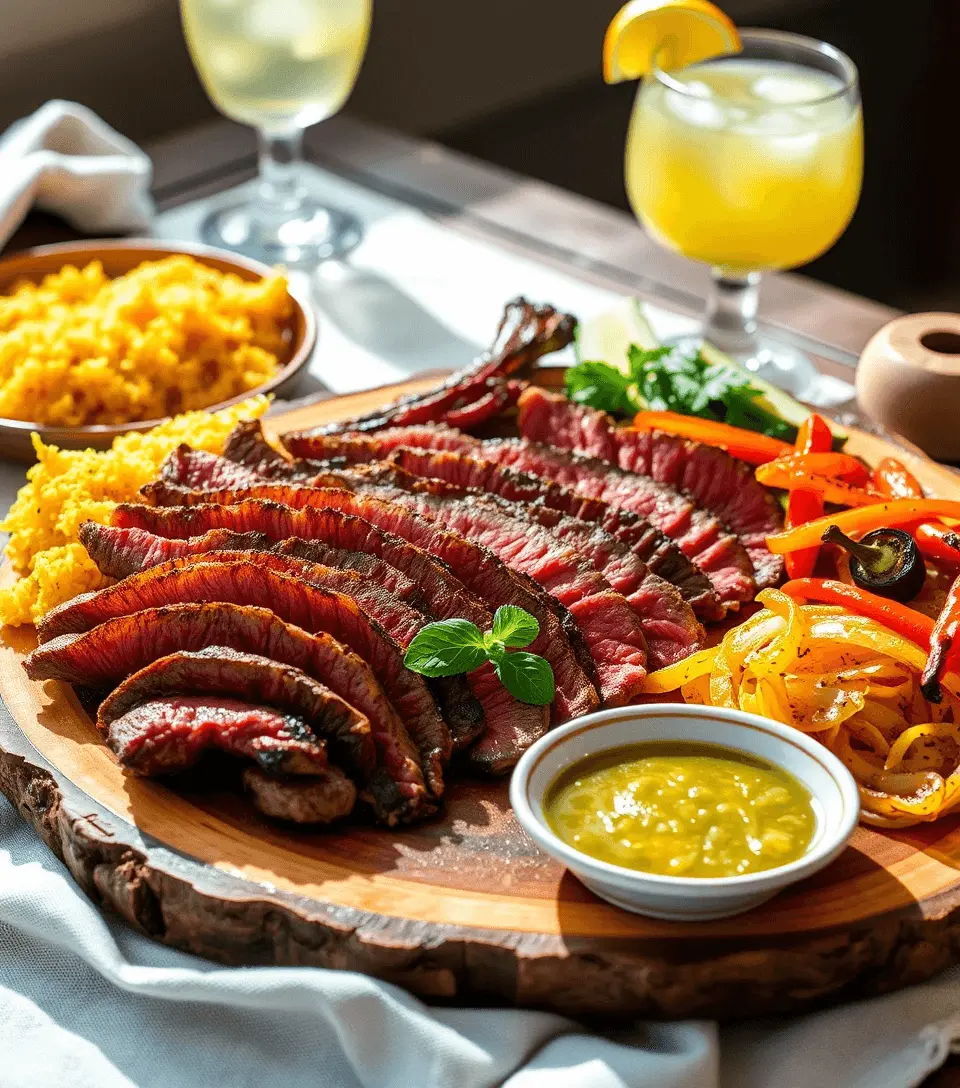
Serving Picanha Like a Brazilian Pro
Alright, your Picanha’s off the grill—golden, juicy, and smelling like heaven. But wait! Don’t touch that knife yet. Slicing wrong could ruin everything. Think of this like the grand finale of a fireworks show: Presentation and pairings make your Picanha sing . Let’s talk like a true churrasqueiro (that’s Portuguese for ‘grill wizard’)
The Art of the Carve: Slice Like a Boss
Here’s the deal: Picanha’s only as good as the knife work. Slice against the grain —those tiny muscle fibers? You want to cut them short, not fight them. Think of it like petting a cat the right way. Use a long, sharp carving knife and aim for ¼-inch slices. Tender as a love song? You’ve nailed it.
*Now, channel your inner Brazilian grillmaster: Skewer the meat (fat cap up!) and carve tableside. Picture a wooden platter, slices fanned out like petals, the fat cap crackling with every cut. And here’s the secret: Don’t slice it all at once. Keep the rest whole to stay warm and juicy—like a steak burrito wrapped in foil
Sides That Steal the Show
Picanha’s the queen, but these sides are her royal court. Let’s break it down:
Farofa : Think of it as the Brazilian version of garlic bread but with a crunch. Toasted cassava flour, crispy bacon bits, and fresh herbs—sprinkle it on your plate like confetti.
Grilled veg : Bell peppers, zucchini, and onions kissed by the same fire that cooked your steak. Char is key—no soggy veggies here!
Vinagrete : This ain’t your average salsa. Diced tomatoes, onions, cilantro, and lime juice—bright, tangy, and the perfect foil to all that rich beef. Make it ahead, and don’t skip the cilantro.
Pro tip: Skip the mashed potatoes. This isn’t a steakhouse—it’s a flavor fiesta. Keep it light, keep it fresh.
Drinks That Dance With Picanha
You wouldn’t wear neon socks with a tuxedo—pair your steak right. Here’s how:
Red wine : Grab a Malbec or Cabernet Sauvignon. These bold reds love fat like peanut butter loves jelly. Swirl, sip, and savor.
Caipirinha : Brazil’s answer to liquid joy. Cachaça (sugarcane rum), lime, and sugar muddled to perfection. It’s like a beach vacation in a glass—sharp enough to cut through that buttery steak.
Sparkling water : A palate cleanser between bites. Think of it as a reset button for your taste buds.
No alcohol? No problem. Guaraná soda (a bright red Brazilian soda) is sweet, fizzy, and weirdly perfect. Your guests will ask, ‘What is that?’ and then drink three more.
Pro Tips to Avoid Common Mistakes
Resting Isn’t Lazy—It’s Science
*Here’s the deal: That juicy steak you just grilled? All those delicious juices are locked inside the meat. Slice too soon, and they’ll run out like a busted piñata. Let it rest for 10 minutes (yes, even if your guests are hovering like vultures). Loosely tent with foil to keep it warm. Trust me, the wait is worth it. I once skipped resting and served a dry, chalky Picanha. My dad still hasn’t let me live it down
Temp Wars: Don’t Guess, Test
Your eyes lie. Your instincts lie. Your meat thermometer? It’s the only truth-teller here. Here’s the cheat sheet:
Medium-rare : 130°F–135°F (the sweet spot—tender, juicy, and slightly pink).
Medium : 140°F–145°F (for the “less pink” crowd—still good, just less drama).
Well-done : 155°F+ (only do this if you’re reverse-searing or smoking—otherwise, it’ll taste like sadness).
Pro tip: Pull it off the grill at 125°F (for medium-rare) and let carryover cooking do its thing. Think of it like a slow dance with heat—it finishes the job while you rest.
Don’t Crowd the Party
*Imagine trying to fry bacon in a pan stacked like a Jenga tower—nope, right? Same goes for Picanha. If you toss multiple steaks on the grill at once, you’ll get gray edges and raw centers. Cook one at a time, or use a two-zone fire: Sear over direct heat, then move to indirect heat to finish. It’s like giving each steak its own VIP booth. Your patience will be rewarded with that golden crackle everyone loses their minds over.
Never Waste the Gold
That crispy fat cap after cooking? It’s not trash—it’s treasure. Don’t toss it! Here’s what to do:
Drizzle magic : Melt it down and pour it over roasted veggies, rice, or even popcorn. Yes, popcorn. Thank me later.
Sauce base : Simmer with garlic, rosemary, and a splash of vinegar for a rich, umami-packed sauce.
Fry like a pro : Use it to sauté eggs, mushrooms, or potatoes. It’s like adding a secret layer of beefy joy.
Real talk: I once threw mine away. My butcher called me a criminal. Don’t be me.
Homemade Meatball Sub Sandwich: Juicy meatballs & tangy sauce, better than takeout! Easy recipe with gluten-free options.
1 thought on “How to Choose and Prepare Picanha Like a Pro”