Imagine slicing into a seared Ahi Tuna steak with a golden, crackling crust that gives way to a blush-pink, buttery-soft center. The aroma of toasted sesame, fresh ginger, and citrus fills the air, and every bite tastes like it’s straight from a high-end sushi bar. This is the magic of our Best Seared Ahi Tuna Recipe: Restaurant-Quality at Home —a dish that feels luxurious but comes together in just 20 minutes.
Let’s face it: Ahi Tuna often intimidates home cooks. Myths about needing professional skills or pricey equipment swirl around this delicacy. But here’s the truth: With the right technique and fresh ingredients, you can master a restaurant-quality seared Ahi Tuna recipe without stepping foot in a gourmet kitchen. This guide breaks down every step, from selecting sushi-grade fish to nailing that crave-worthy crust.
The secret lies in simplicity. A screaming-hot pan, a sprinkle of salt, and a fearless approach to high heat transform thick-cut tuna steaks into a dish worthy of a chef’s signature. Whether you’re a beginner or a seasoned cook, this recipe empowers you to create a meal that’s equal parts elegant and effortless.
But why stop at the basics? We’ll also explore flavor upgrades—think sesame-soy glazes, spicy wasabi mayo, and bright citrus garnishes—to make your seared Ahi Tuna recipe unforgettable. Pair it with steamed rice, avocado slices, or a crisp salad for a complete meal that dazzles.
By the end of this post, you’ll not only have a foolproof method for cooking Ahi Tuna but also the confidence to customize it. Are you prepared to transform your kitchen into a gourmet eating area? Let’s get started.
Choosing the Best Ahi Tuna for Searing
The foundation of a restaurant-quality seared Ahi Tuna recipe starts with selecting the freshest, highest-grade fish. Here’s how to pick and prep like a pro:
What to Look for in Sushi-Grade Tuna
Sushi-grade Ahi Tuna is non-negotiable for achieving the melt-in-your-mouth texture of restaurant dishes. Key freshness indicators include:
- Vibrant color : Bright red or deep pink flesh (avoid dull or brownish hues).
- No fishy scent: Fresh tuna shouldn’t smell too “fishy” or ammonia-like, but rather like the ocean.
- Firm texture: When squeezed, the skin should bounce back rather than feel mushy.
Why sushi-grade matters : This designation means the tuna has been frozen to FDA standards (-20°C/-4°F for 7+ days) to eliminate parasites, making it safe to eat raw or seared rare.
Where to Buy High-Quality Ahi Tuna
Source wisely to ensure quality and safety:
- Fish markets : Opt for reputable vendors who can confirm the tuna’s origin and handling.
- Specialty grocery stores : Chains like Whole Foods or local Asian markets often carry sushi-grade options.
- Online suppliers : Trusted brands like Catalina Offshore Products or SushiSwap deliver fresh, flash-frozen tuna.
Pro Tip : Ask, “Is this sushi-grade and when was it thawed?” Freshness is key—avoid pre-packaged tuna that’s been sitting for days.
Prepping the Tuna Before Cooking
Prep steps for a flawless sear :
- Dry with a pat: To get rid of extra moisture from the surface, use paper towels.. This ensures a crisp crust.
- Optional oil brush : Lightly coat the tuna with sesame oil or avocado oil (high smoke point) to enhance browning.
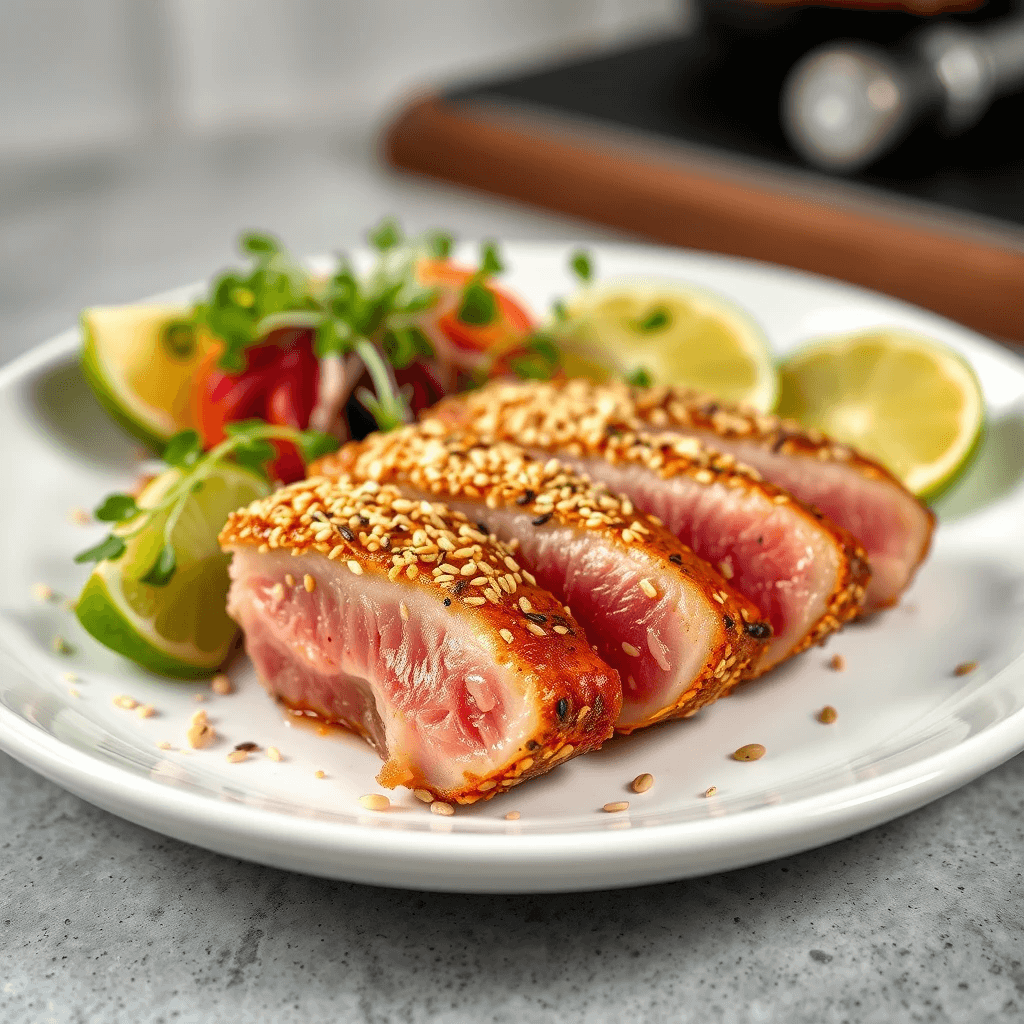
- Season simply : Sprinkle both sides with salt, pepper, and sesame seeds (if using) right before cooking.
Avoid over-handling : Let the tuna come to room temperature for 10–15 minutes before searing for even cooking.
Step-by-Step Searing Technique
To achieve a restaurant-worthy sear on your Ahi Tuna, precision and timing are critical. Follow these expert steps to lock in flavor and texture:
Heating the Pan for a Crispy Crust
Preheat strategically :
- Choose the right pan : Opt for a cast-iron skillet or stainless steel pan —their heat retention outperforms non-stick alternatives.
- Heat aggressively : Warm the pan over medium-high heat until it’s extremely hot. Test readiness by flicking a few drops of water into the pan—they should vaporize immediately.
- Oil wisely : Add 1 tsp of avocado oil or toasted sesame oil (both have high smoke points) and swirl to coat the surface.
Science behind the sear : High heat triggers the Maillard reaction, creating that crave-worthy caramelized crust without overcooking the tender interior.
Seasoning and Searing Time
When the pan is blazing hot , it’s time to cook:
- Season boldly : Lightly pat the tuna dry (if needed), then press a mix of sea salt , black pepper , and toasted sesame seeds onto all sides.
- Sear without fear: Use tongs to place the tuna in the pan.. Let it sear undisturbed for 1–2 minutes per side to build a golden crust.
- Optional edge sear : For thicker steaks, hold the tuna upright with tongs to sear the edges (30 seconds total) for an all-over crisp finish.
Important tip: To guarantee a consistent crust, do not move the tuna in the middle of the searing process.. For medium-rare, aim for an internal temperature of 125–130°F (52–54°C).
Checking Internal Temperature
Guarantee perfection with a thermometer :
- Insert the probe into the thickest part of the tuna.
- Target 125–130°F (52–54°C) for a warm, rosy center.
- Rest the tuna : Let it sit on a cutting board for 3–4 minutes to lock in juices.
No thermometer? No problem : Slice into the tuna—the center should resemble a rare steak (warm and pink, not cool or opaque).
Flavor Enhancements & Sauces
Take your seared Ahi Tuna from simple to spectacular with these bold, easy-to-make accompaniments. Each sauce and garnish is designed to complement the tuna’s rich flavor while adding gourmet flair:
Classic Sesame-Soy Glaze
A umami-packed finishing touch :
- Ingredients :
- Three tablespoons of low-sodium soy sauce (or, if gluten-free, tamari)
- 1 tbsp honey or maple syrup
- 1 tsp grated fresh ginger
- 1 tsp toasted sesame oil
- Optional: ½ tsp rice vinegar for brightness
How to make it :
- In a small bowl, whisk together all the ingredients until smooth..
- Brush the glaze onto the tuna after searing or serve it on the side for dipping.
Pro Tip : Simmer the glaze in a saucepan for 2–3 minutes to thicken it into a sticky lacquer.
Spicy Wasabi Mayo
Creamy heat to balance the tuna’s richness :
- Ingredients :
- Half a cup of mayonnaise (or, for a lighter alternative, Greek yogurt)
- 1 tsp wasabi paste (adjust to taste)
- 1 tsp fresh lime juice
- Pinch of sea salt
How to make it :
- Stir all ingredients in a bowl until fully combined.
- Taste and adjust with extra wasabi or lime for punch.
Serving Idea : Drizzle over sliced tuna or use as a dip for vegetable crudités.
Citrus-Herb Garnish
Fresh, zesty contrast to the seared crust :
- Ingredients :
- 1 tbsp ponzu sauce (or fresh lemon/lime juice)
- 1 tsp sesame seeds (toasted for crunch)
- Small handful of microgreens or thinly sliced scallions
How to assemble :
- Drizzle ponzu or citrus juice over the plated tuna.
- Sprinkle with sesame seeds and microgreens for a pop of color and texture.
Why it works : The acidity cuts through the tuna’s richness, while herbs add a vibrant finish.
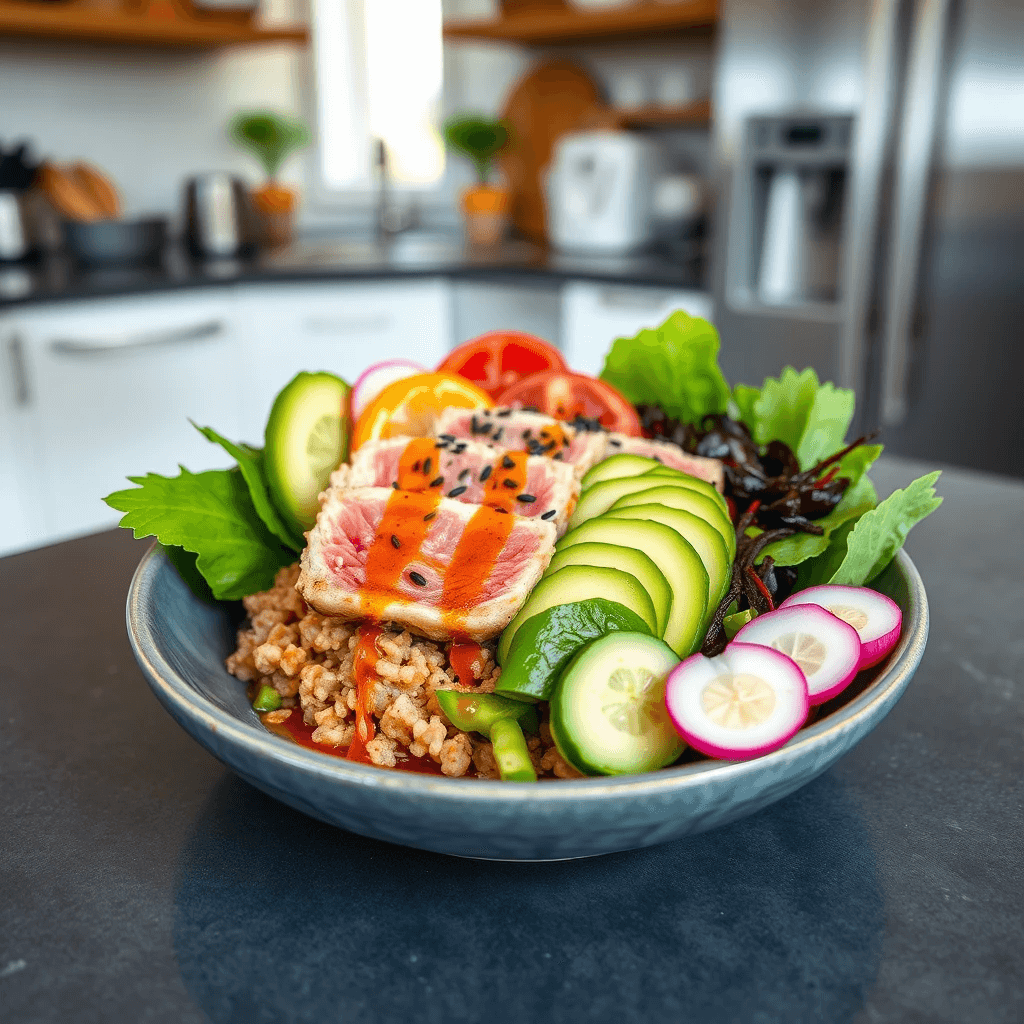
Serving Ideas for a Complete Meal
Elevate your seared Ahi Tuna from a simple entrée to a memorable dining experience with these thoughtful pairings and presentation hacks:
Asian-Inspired Sides
Complement the tuna’s bold flavors with these harmonious dishes:
- Steamed jasmine rice : Fluffy and fragrant, perfect for soaking up sauces.
- Seaweed salad : Salty, briny, and crunchy—balance the richness of the tuna.
- Edamame : Toss with sea salt and a sprinkle of chili flakes for a protein-packed starter.
Pro Tip : Add a small bowl of pickled ginger or a drizzle of sriracha aioli to the plate for extra dimension.
Low-Carb Options
Lighten up the meal without sacrificing flavor:
- Cauliflower rice : Sauté with sesame oil and green onions for a keto-friendly base.
- Avocado slices : Creamy texture contrasts beautifully with the seared crust.
- Cucumber salad : Toss thinly sliced cucumbers with rice vinegar, sesame seeds, and a touch of honey.
Why it works : These sides keep the focus on the tuna while adding freshness and fiber.
Presentation Tips
Plate like a chef to impress guests (or your Instagram followers!):
- Slice diagonally : Cut the tuna into ½-inch thick slices to showcase the medium-rare center.
- Fan the slices : Arrange them slightly overlapping on a white plate for visual appeal.
- Garnish strategically : Sprinkle toasted sesame seeds , microgreens, or thinly sliced scallions.
- Add color : Place a wedge of lime or a few edible flowers (like nasturtium) beside the tuna.
Pro Tip: For a touch fit for a restaurant, creatively drizzle a little sauce over the plate using a spoon or squeeze bottle.
Pro Tips for Success
Mastering the art of restaurant-quality seared Ahi Tuna goes beyond the recipe—it’s about finesse. These expert tips ensure flawless results every time:
Avoid Overcooking
Tuna’s biggest enemy is overcooking , which turns its buttery texture dry and chalky:
- Use a timer : Sear for 1–2 minutes per side for medium-rare (adjust slightly for thicker steaks).
- Monitor temperature : Aim for 125–130°F (52–54°C) internally. Remove the tuna just before it hits this temp, as carryover cooking increases heat by ~5°F.
- Visual cues: The center should remain soft and pink, but the outside should be crisp and caramelized.
Pro Tip : Treat tuna like a premium steak—err on the side of undercooking for maximum tenderness.
Storage & Reheating
While best enjoyed fresh , leftovers can still shine with proper care:
- Refrigerate promptly : Store in an airtight container for up to 24 hours (not 1 day, as freshness degrades quickly).
- Reheat gently : Warm in a skillet over low heat for 1–2 minutes per side (avoid microwaving, which dries it out).
- Repurpose leftovers : Flake chilled tuna into salads, wraps, or poke bowls for a new twist.
Note : Tuna loses its signature texture when reheated, so prioritize fresh servings for entertaining.
Substitutions for Dietary Needs
Adapt the recipe to fit your lifestyle :
- Gluten-free : Swap soy sauce for tamari or coconut aminos.
- Low-sodium : Use coconut aminos (naturally lower in salt) or reduce added salt.
- Oil alternatives : Substitute avocado oil with grapeseed oil (another high-smoke-point option).
Why it works : These swaps maintain flavor integrity while aligning with dietary goals
How to tell if tuna is sushi-grade?
Sushi-grade tuna should:
- Be labeled “sushi-grade” or “sashimi-grade” by the seller.
- Have a vibrant red/pink color (no browning).
- Smell like the ocean, not fishy.
- Feel firm to the touch. Always purchase from a trusted fishmonger or supplier.
Which side dish pairs best with seared tuna?
Pair your seared Ahi Tuna with:
- Asian-inspired : Steamed jasmine rice, seaweed salad, or miso soup.
- Low-carb : Cauliflower rice, avocado slices, or cucumber salad.
- Fresh : A citrusy green salad or mango avocado salsa.
This Best Seared Ahi Tuna Recipe proves that restaurant-quality meals are achievable at home. With its crispy crust, buttery center, and endless flavor possibilities, it’s a dish that’s as versatile as it is elegant. Whether you drizzle it with sesame-soy glaze, spice it up with wasabi mayo, or keep it simple with a squeeze of lime, this recipe invites creativity.
Why not try it tonight? Serve it over a colorful poke bowl, add a splash of chile oil, or replace the tamari with soy. The options are limitless—and the results are always impressive.
Classic Egg Salad Sandwich Recipe: A Step-by-Step Guide to a Delicious Breakfast Rich in Healthy Proteins. I hope you try the recipe.
1 thought on “Best Seared Ahi Tuna Recipe: Restaurant-Quality at Home”